Showing posts with label D.Y.I. Projects. Show all posts

5.25.2012

The Great Rug Debacle

I know this is going to seem very shallow that a great debacle I am currently having is over a rug but, I stress over the little details.

We, but that I mean I, have finally decided on colors for Baby Buttercups nursery! I was originally thinking a Tiffany blue with pink and I purchased this rug from Urban Outfitters. It was on back order until June. 


Then I decided the Tiffany blue is not my color and I was just seeing it all over Pinterest and was captivated by Tiffany blue. That Tiffany blue has captivating powers and gets you sucked in. When we thought Baby Buttercup was a boy I had picked out this navy herringbone rug from Urban Outfitters


I then became very fickle and wend back and forth from Tiffany blue to navy. I was asking everyone I know which color they liked best. That turned out to be no hope because everyone was split. 

Back to the drawling board. I began the search all over for new inspiration. And then I found this:


source

And this too:

source


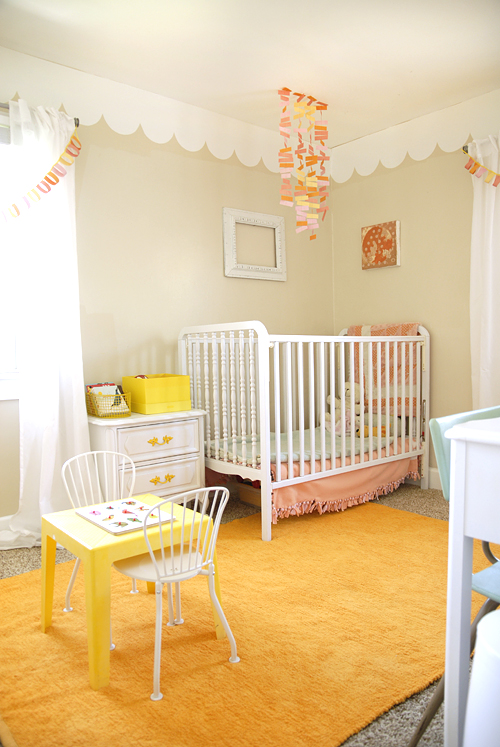
And then it was decided, a grey, pink and yellow nursery it will be. 
I always knew I wanted the walls painted gray, and that was done before we even moved into the new place. 

So now that I am 100% decided on colors, I have to go back to finding a new rug. Then out of the depths of my rug despair {saying in a very overly dramatic tone}, I found a great yellow rug on Overstock! It was perfection. Chenille. Shag. Perfection. 


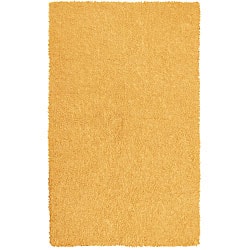
 Ordered it  and it came in and it was not even close to perfection. It was a beige/pale yellow, very nice but not what I wanted. I was crushed and was even trying to talk myself into liking it for the room-but it was so not going to work. 
So back to square one- completely rug-less. 
I can tell you all feel such pity for me and my Great Rug Debacle. 

To be continued...

10.12.2011

Old Window - New Frame

So I know I have been talking about this Living room Re-Do for a while with no prevail... well here is a sneak of whats going on..

Enrty way
{which is very skinny and hard to get a good photo of..}

Window Frame Monogramed Letter B


So I origianlayy saw this idea on a blog but I have lost the blog in blogland. Should of bookmarked it I know.... if I find it I will update with the original link.

I had found the window at the Irvine Flea Market for 10 bucks. It was painted white with about 3 million coats. So I took the sander and started doing work


And I got over very quickly sanding and sanding... As I was sanding and sanding I am finding the window was originally yellow, then pink and finally white. So I thought I would just sand it so all the colors could come through. Showing the character of the window{plus  I was tiered of sanding and sanding}.


Next comes the fun part!
Picking through an old Webster Dictionary that I had and pulling out words that I like and would want to see. I felt bad ripping out pages of a book and it went against some moral standing I have about books but I was repurposing it so I felt a little better about the whole situation.

Now the blog posting that I had orgionally read, I believe, the person glued the pages directly onto the window but I want my pages to behind the glass, more like a picutre frame.
So I got a piece of cadboard and cut it out to fit behind the glass.
Got out my trusty Mod Podge and started putting on a thin layer on the cardboard.


Doing only small sections at a time, lay down your first piece.


Make sure to the pull your foam brush fro the center to the edge of the page. Go over the edges a couples times to keep them down.
It doesn't matter what direction you put them in- get creative! Its one of those projects where there is no right or wrong way to do it.


Keep going and going. I fyou are crazy like me this portion will take you a while...


Helpful hint: Once you lay your paper down- your not pealing it back up! So be in love with where you set it down the first time! The Mod Podge works really well and you will rip your page!


So I coated al the pages one more time, it gives it a nice crisp shinny look.
The wooden B I had got at Michael's a long time ago and spray painted it black. It was hanging in out picture collage for a long time.


Set my trusty dictionary on top and let it sit while I enjoyed lunch.


We put a picture frame kit on it that we got from our local hardware store.
Now it hangs beautifully in our entry way.
{Right over my empty bookshelf....}


8.28.2011

Getting Things Done!!

So remember a couple posts ago{here} I made myself a new coffee table from pallets and wanted to re-purpose my old one?? Well I did it!! YA!! for getting things done! And it actually got done last week too. But I have been crazy busy this past week so its has taken me a week to post it- sorry:) 
So the coffee table was form Ikea{I think} and was stained dark brown. 


Cut it in half!!
One bench for me and one bench for my brother- sharing is caring:)


My brother{who is an amazing artist} made fake notches in the wood to make it look like planks and then he gave is a antiqued white finish
Gave the bench back legs and finished those legs to match
He is using a glaze finish

  
So I couldn't take a photo of my half of the bench because the lighting in my patio is terrible. So here is my brothers half of the table, it looks great!

8.09.2011

Headboards from heaven

So if I could have a house with 10 bedrooms so I can have 10 different headboards, I would be happy! I just love the statements that headboards make in a room. Here are some photos of inspirational headboards...


8.07.2011

The week that never stops...

The week just went right into the weekend, which flowed right back in to the work week, then the work week pushed over into the weekend again. So here I am sunday morning wondering where the past 2 weeks went??!!?!? 
OHHHH YEAAA I got a summer flu!! I never knew you could get the flu in summer but I guess that is a wonderful benefit of being a preschool teacher! Yea for building up those immunities! Then after getting over my sickness I got all my knew kiddos for  the school year! So we have all been busy bees at work getting the kids acquainted with their new class. 
My weekends have been so busy making pillows and running errands. I am hoping to have my Etsy Shop up and running soon. And you all will be the first to know! 

I did have time the past week to make something fun! I am not too sure where I first saw the idea of using 2 pallets as a coffee table but I know its all over DYI home blogs. My husband was actually the big pusher to do this project, he went out and got us the pallets and was adamant on starting working on it asap! It wasn't until we started getting into he project that he disappeared and I finished it with my dad-typical. 

So let get to it! You will need:
-2 pallets
-4 wood blocks
-4 wheels
-32 screws
-paint or stain 

So all of the items you really need depends on what time of pallets you have. I did not know this until we stared the project but you can actually buy brand new pallets for around 15 bucks and there are a couple different types, so the construction depends on what type you have. We got our pallets from Home Depot.


First start off with cleaning and sanding the pallets down. Make sure to sand down all the edges and corners. Our pallets had a 2x4 that was on the bottom for extra support. I cut those off because I wanted to be able to have a shelf for magazines and books. Here is proof I worked on the pallets...


I set the pallets on top of each other and realized they needed to be a bit farther apart. My dad, who is a painting contractor, has a shop that has some good finds if you just walk around. I was able to find a 4x6 and cut it down to 4 4x5 blocks.


My dad had some left over gray paint that we watered down and applied only to the top wood slats. I wanted to keep the unfinished look on the pallet but class it up a little. While the paint dried I sanded down the wood blocks that we put between the 2 pallets.


Next you just do some simple stacking!! pallet on bottom, 1 block in each corner, and 1 pallet on top. Do not worry about everything being exactly lined up and perfect looking, thats not the point of having a up-cycled coffee table. Its suppose to be a little crooked and a tad unfinished looking. Like in the photo above, my corners are not all straight and perfect but it still looks good {well I think so!} As you can seen our screw holes aren't too pretty and the over hang isn't even on all sides but that what gives it character.


And really, just like that the majority of the project was done! Then came Monday and we got a little distracted.. then came Tuesday and my husband went down to Home Depot and got us some wheels! I was not going for an industrial look, but if you are, go with big wheels. Ones with locks are better than the ones without.


And here we are with a new coffee table! Not sure how long we will keep this one.. but we already have some great ideas for our old one! I want to cut it in half and make an outdoor bench for it! I hope we actually do it one day!

****All the pillows on my sofa I made and will be available on my Etsy shop!****

7.25.2011

Its all about the little things

Isn't apartment living just the greatest?? NOT! I feel like every apartment is the same! "Same old" 1 bedroom with 1 bathroom and galley kitchen. "Same old" white walls and brown carpet. "Same old" yellow lighting. I can't start knocking down walls and putting in a new kitchen, even tho I would LOVE to! 
So in my quest to give my "same old apartment" some charm I have decided its all in the little things. Adding in my style and personality with out putting in tons of $$ to a place I don't own.  
Here are a few things I have done around my place to give it some personality...

Bathroom

I once had a towel bar but now I have beautiful 
hooks. We purchased these hooks for about a buck a piece at a Goodwill in Ventura, CA. Subtle things like this make a difference. 


And for my hand towel I purchased this little birdie at Urban Outfitters. They have AMAZING online sales.

Bedroom
Personalize it.
Not sure how it came about but my husband and I have always wrote h & j on everything, its just something we have always done. My bed is a rather large statement piece so I didn't want to add a large picture on top but I did want to have some thing to balance it out. I picked up these metal letters from a seller at the Rose Bowl Flea Market. Just a added little some thing...the head board I had made out of an old fireplace mantel. I had bead board added to the back and raised it about 6 inches. Its probably one of my favorite items in my house.

Living Room or Kitchen
Change out your knobs. Easy squezy way to change your furniture or kitchen cabinets. We got these knobs at World Market. Knobs can be very pricy so wait for a sale, like we did, or shop flea markets. If your trying to go with a more eclectic feeling use different knobs in no specific order. 


Outdoor
If you have outdoor space, put flowers in it! We got these flower boxes from Home Depot they have a great return policy for flowers too! I don't know if its just me but I am so into the colors that comes out of the ground. How God could just make a flower so vibrant. I am so amazed by all the different shades of green that comes from the grass and different bushes. So I added a succulents...
My hubby made this out of an old pallet. We had seen it at a local store on Main St. Another easy way to add to your patio if you don't have a tone of space. We added wood in between the slates to hold the plants and nailed it into the wall(hope the landlord doesn't mind). 

Well I hope this helps some of you hopeless apartment owners. Life doesn't have to be so blah anymore. Step out and change it up. 

And just for some added fun....
My Love, My Life, Jack. 
Related Posts Plugin for WordPress, Blogger...